LEAD Computer Science - Lab 3
Due: Thursday, July 19 at 8pm
Please complete all parts of this lab in a file called lab3.py. When you
are finished, run the test script (see below) and if you're satisfied that
everything is working correctly, submit the file on csman for Lab 3.
This assignment should not take too long, but it will serve as a "warm-up"
for lab 4, which will involve drawing more complex figures as well as using
recursion.
Introduction to turtle graphics
Computer graphics is an interesting and useful application area for computer
programming. There are many ways to do computer graphics in Python, but the
easiest way is using what is called "turtle graphics". In turtle graphics, a
window is displayed along with a shape called a "turtle" (it doesn't have to
look like a turtle) that moves around the window and draws lines as it moves.
We say that the turtle controls a "pen" which draws the lines. The pen can be
down (drawing lines) or up (not drawing lines) and the pen can have any color
the programmer wants. The programmer can control where the turtle moves, what
color gets drawn, whether closed shapes get filled with colors, and so on.
Using only a small number of commands, you can create very interesting and
complex images.
On a computer graphics display, we measure distances in "pixels", which are
very small squares of a single color. Pixels aren't always the same size on
every computer, but we will still measure distances as some number of pixels.
The window uses an X-Y coordinate system like you've seen in math classes; the
origin of the coordinate system is in the center of the window. The "turtle"
starts at the origin and is initially pointing to the right.
Here is a very simple example of a program which draws the outline of a red
square in a window:
  from turtle import *

  # Set the pen's color to red.
  pencolor('red')

  # Go 100 pixels to the right (in the direction the turtle is pointing).
  forward(100)

  # Turn the turtle 90 degrees to the right.
  right(90)

  # Go another 100 pixels forward.
  forward(100)

  # Turn right again.
  right(90)

  # Do this two more times.
  forward(100)
  right(90)
  forward(100)
  right(90)

  # Now we've drawn a square in the window, and the turtle is back
  # where it started.
This will display the following image:
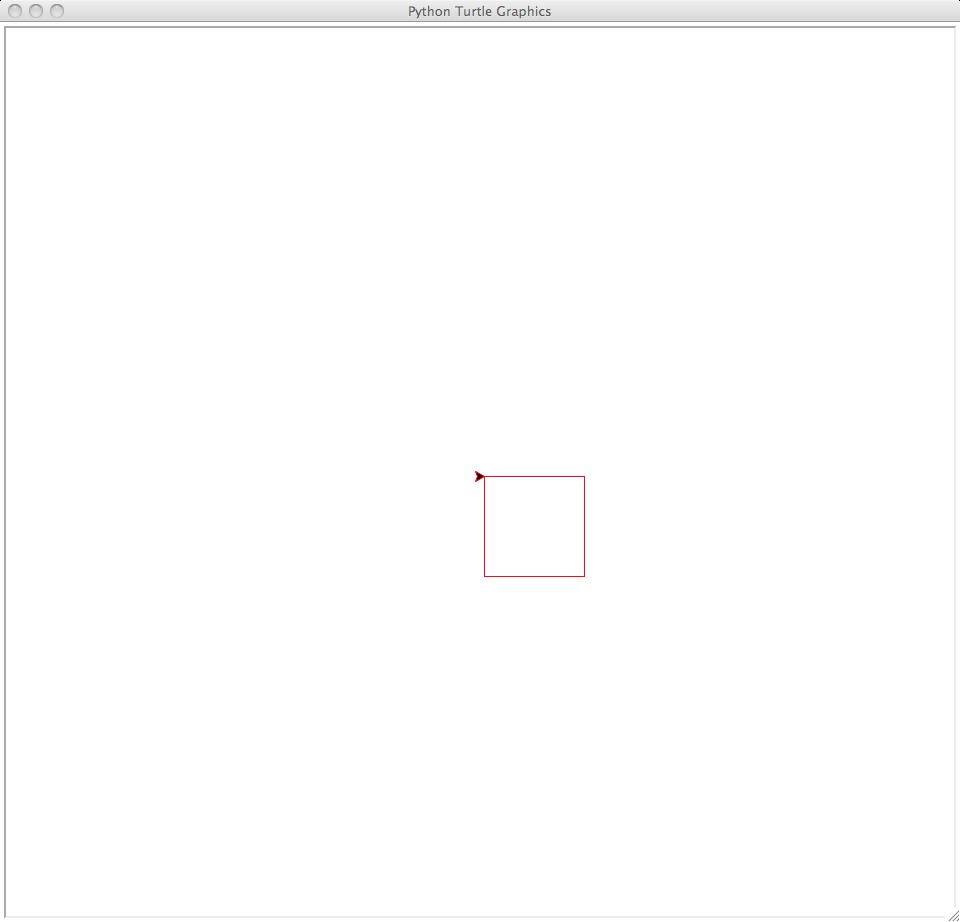
Note the shape of the turtle (the little arrow-shaped thingy in the center).
You should type this program into Python to see what it does. Note that we
could simplify it like this:
  from turtle import *

  pencolor('red')

  for i in range(4):
      forward(100)
      right(90)
Type this program in too. To clear the screen, use the clear() command.
If you don't want to see the turtle type in the hideturtle() command. Most
of the pictures below have the turtle hidden.
You may have noticed the line:
from turtle import *
We've told you in lecture to avoid using the from <module> import * form
in your code. Usually this is the case, but here we need to use a lot of
functions from the turtle module, and it would be a nuisance to write e.g.
turtle.forward(100) instead of just forward(100). There are no absolute
rules in programming!
If you wanted to fill the square with the red color, you could do it like
this:
  from turtle import *

  pencolor('red')
  fillcolor('red')  # set the fill color to red
  begin_fill()

  for i in range(4):
      forward(100)
      right(90)

  end_fill()       # fill the square with red
Again, try this out.
One very important thing to be aware of when using turtle graphics is that if
you don't set a particular value (say, the pen color) it will use a default
value (for the pen color, it will be black by default). So you don't have to
specify everything if the default values are what you want. Also, if you change
a value, it stays in effect until you change it again. So if you change the pen
color to red, the pen will always draw red lines unless you change the pen color
again. Some of the functions below require you to specify the pen color, and
others don't. If not, don't worry about it! Similarly, if you turn the turtle
so it's pointing straight up, it will always draw lines in that direction until
you turn it again.
Useful functions in the turtle module
Here are the functions you will be using. You should spend a little time
experimenting with them by using them to draw very simple drawings so that you
know what they do. You can also read the Python documentation on the turtle
module, which is located
here.
forward: move the pen forward by some number of pixels. Example:
forward(100).
backward: move the pen backward by some number of pixels. The direction
the turtle is facing doesn't change. Example: backward(100).
right: turn the turtle to the right by some number of degrees. Example:
right(90).
left: turn the turtle to the left by some number of degrees. Example:
left(90).
penup: "raise" the pen so that it doesn't draw even if the turtle moves.
Example: penup().
pendown: "lower" the pen so that it draws when the turtle moves. Example:
pendown().
pencolor: Change the color the turtle draws as it moves. Example:
pencolor('red').
clear: clear the window (remove all drawings). Example: clear().
home: move the turtle back to its original position at the center of the
window, facing right. Example: home().
goto: move the turtle to a particular point in the X-Y coordinate system
(not changing the direction the turtle is facing). Example: goto(-100, 100)
(moves the turtle to the upper left).
pos: return the current X-Y position of the turtle, as a tuple of length 2.
Example: (x, y) = pos() sets x to the X-coordinate of the turtle and y
to the Y-coordinate of the turtle.
showturtle: make the turtle visible. Example: showturtle().
hideturtle: make the turtle invisible. Example: hideturtle().
speed: change the speed the turtle moves. The fastest
speed is speed 0. Example: speed(0). We recommend you use
speed 0 for your drawings if you're impatient.
begin_fill: start a filled shape. Example:
begin_fill().
end_fill: end a filled shape. If the lines that have
been drawn since running begin_fill form a closed shape, that
shape is filled with the "fill color". Example:
end_fill().
fillcolor: change the fill color. Example:
fillcolor('blue').
Random colors
Some functions will need the ability to get a random color. The
random_color function below will return a random string which can be used as
a color name. You should type it into your program file, and don't forget to
import random at the top of the file.
  def random_color():
      '''Returns a random RGB color string.'''
      r = random.randint(0, 255)
      g = random.randint(0, 255)
      b = random.randint(0, 255)
      return '#%02x%02x%02x' % (r, g, b)
Basic exercises using turtle graphics
In the following functions, make sure that nothing gets drawn on the screen
except what is asked for. Using the penup and pendown functions
judiciously will make this much easier. Make sure that the pen is always up
when your functions return.
-
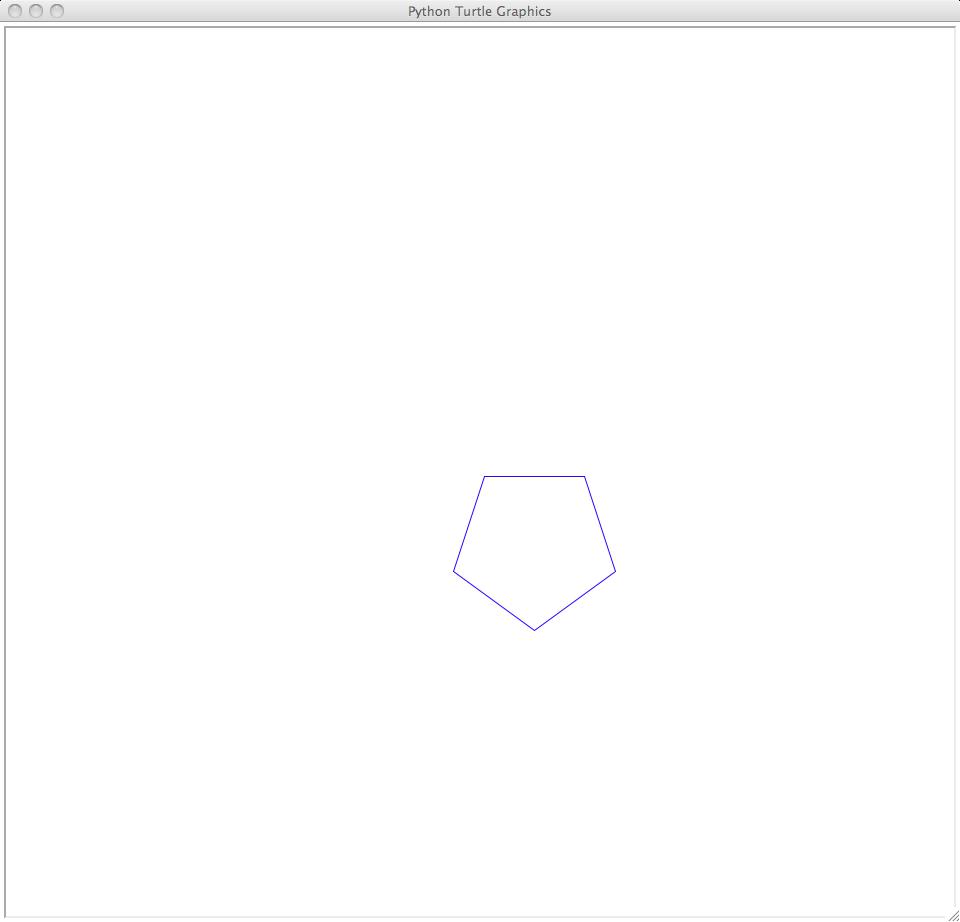
Write a function called draw_polygon that draws polygons with any number
of sides and any color. It takes 4 arguments, which are (in order): the number
of sides, the length of each side (all sides are the same length), a string
representing the color, and a boolean value which is True if the polygon is
filled or False if it isn't. For instance, the function call
draw_polygon(5, 100, 'blue', False) will produce this image:
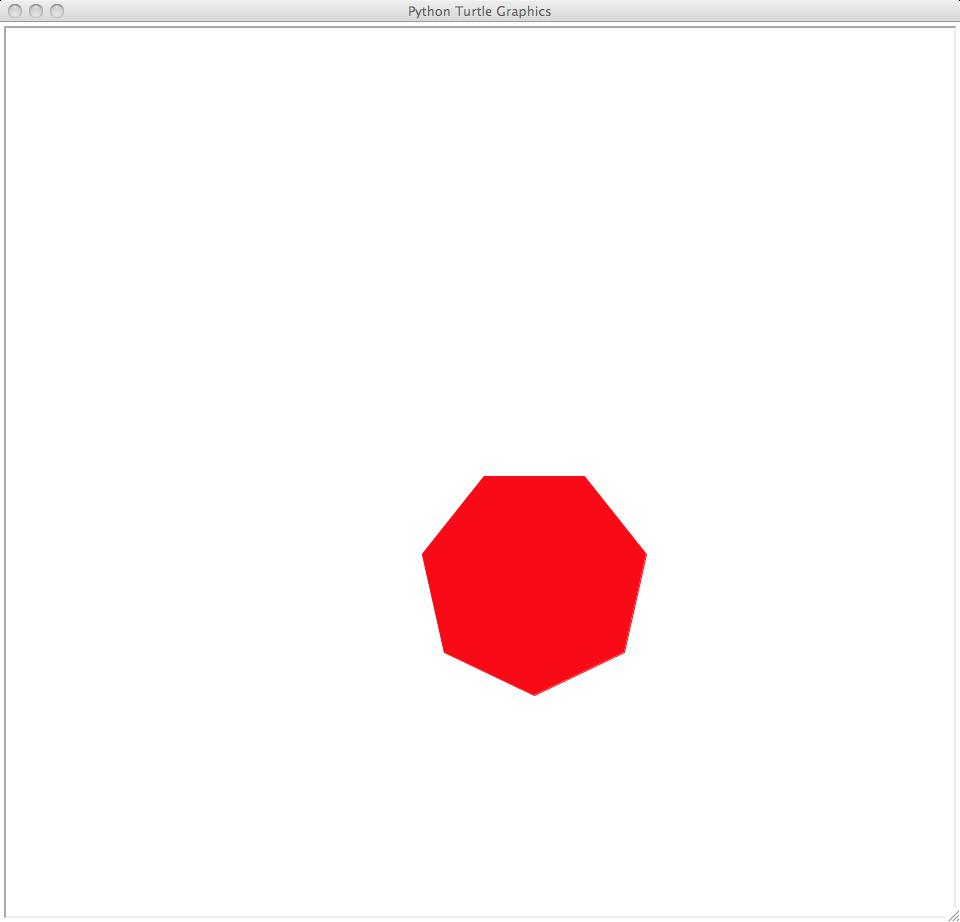
And the function call draw_polygon(7, 100, 'red', True) will produce this
image:
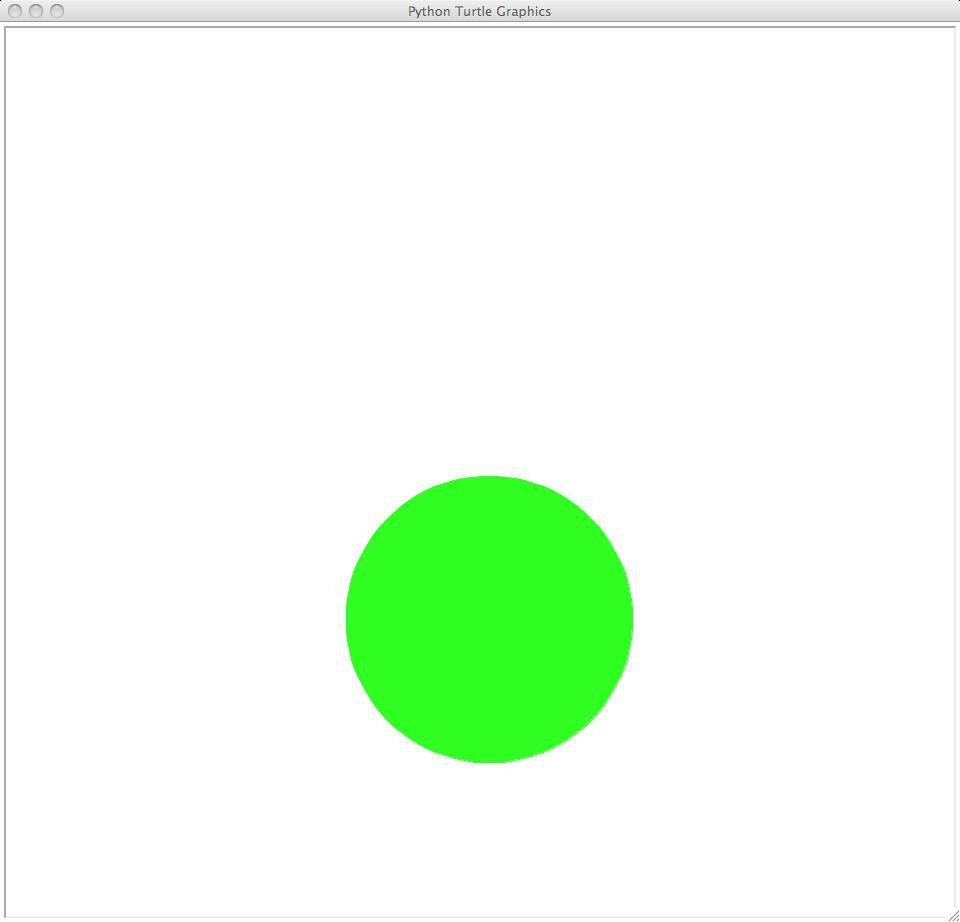
You can even use this function to draw circles if the polygon has enough
sides (it won't technically be a circle, but your eyes won't be able to tell the
difference). The function call draw_polygon(90, 10, 'green', True) will
produce this image:
-
By making a tiny change to the previous function, write a function called
draw_star which draws star shapes. This function will have the same
arguments as draw_polygon. It will only work properly for odd numbers of
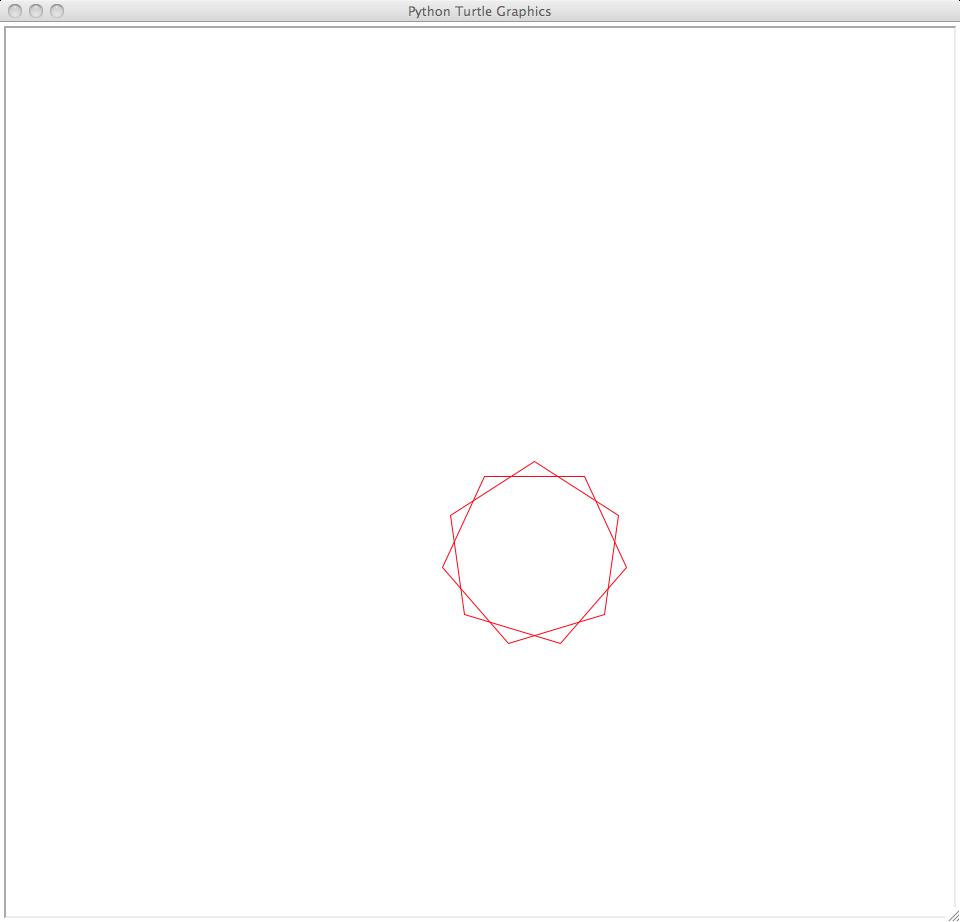
sides (why?). For instance, the function call draw_star(11, 100, 'red',
False) (an 11-pointed star) will produce this image:
-
Write a function called draw_square that draws squares that are centered
on the turtle's location when the function is called. The turtle should return
to its original position and direction at the end of the function too.
Note that this is more complicated than the code for drawing squares given
above, because you have to move the starting point of the drawing to keep the
square centered properly. This should work regardless of what direction the
turtle is facing. The function takes three arguments: the color, the side
length, and a boolean value which is True if the square is filled or False
otherwise. For instance, if the turtle's orientation is facing the
lower-right-hand corner (rotated 45 degrees right from its original
orientation), the function call draw_square('red', 100, True) will produce
this image:

The orientation of the square isn't specified in the function call; it's just
whatever direction the turtle was pointing in when the function was called. If
you like, you can use showturtle() to remind you of what this direction is.
The dot function can also be useful for debugging; it will draw a black dot
at the current location of the turtle. Try debugging it using unfilled squares
so you can see the dot.
-
Write a function called rotated_squares which will draw a series of
squares all centered at the starting point of the turtle, but where each one is
rotated relative to the previous one so that the squares rotate 360 degrees in
all. The arguments are: the square color, the number of squares to draw, and
the length of the sides of the squares. For instance, the function call
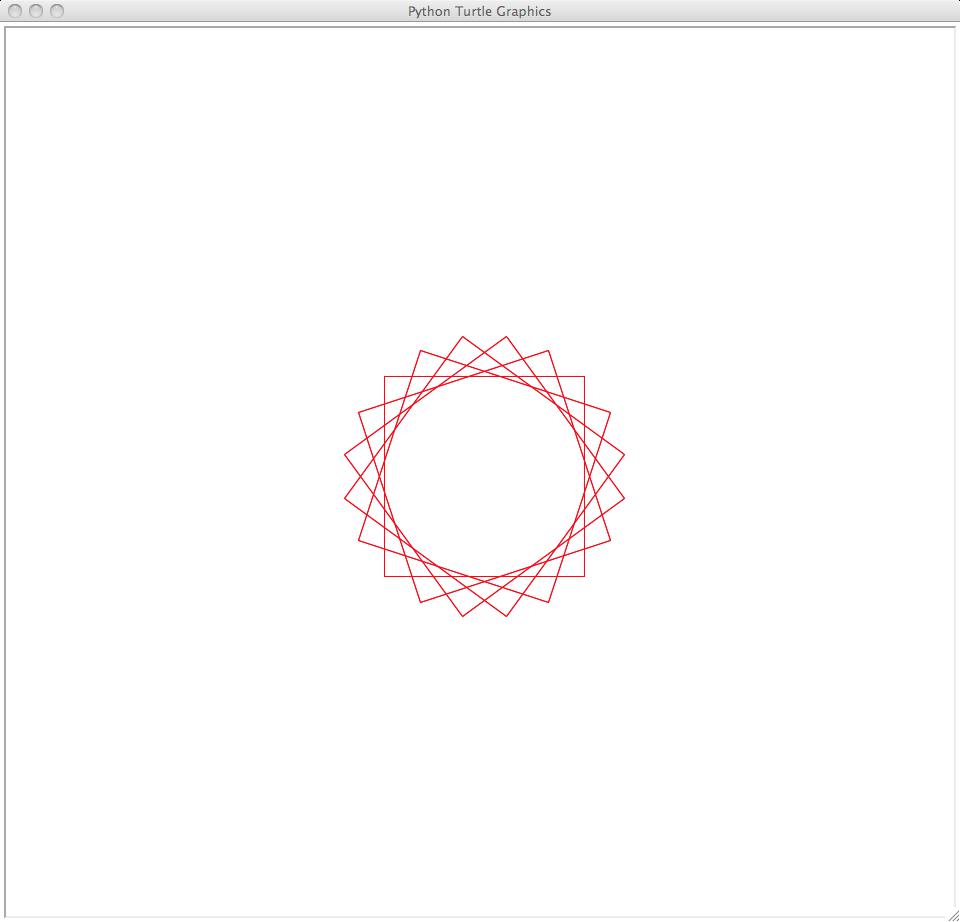
rotated_squares('red', 10, 200) will produce this image:
Use the draw_square function in your definition of rotated_squares to
simplify the code. (This is much simpler than duplicating the code from
draw_square in this function!)
-
Write a function called square_spiral which will draw a spiraling shape
with 90 degree angles. It has three arguments: the number of sides, the initial
side length, and the amount the side length decreases every turn. For instance,
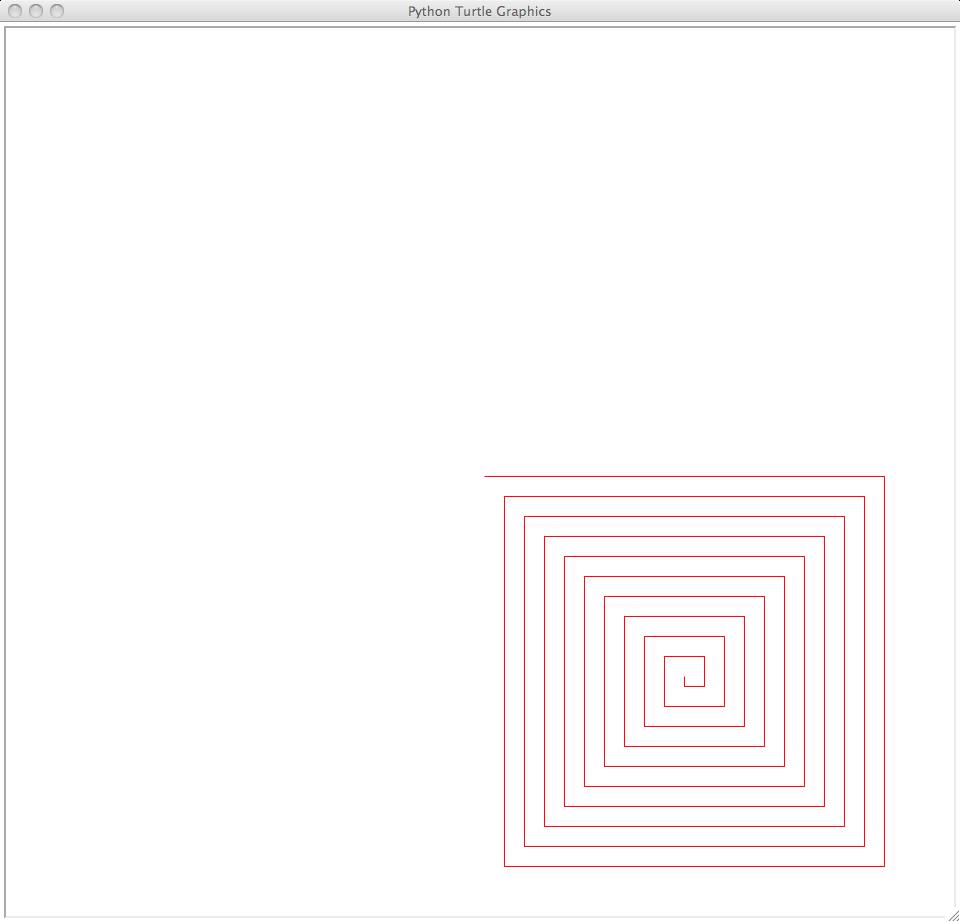
the function call square_spiral(40, 400, 10) will produce this image:
Don't bother trying to center the spiraling shape at the origin; just start
it at whatever location the turtle is at.
-
Write a function called draw_random_squares which will draw a number of
randomly-colored, randomly-sized, and randomly-located squares in the window.
It will take six arguments:
- the number of squares to draw
- the lowest location in the x or y direction where the squares can be
centered on
- the highest location in the x or y direction where the squares can be
centered on
- the smallest allowable side length of a square
- the largest allowable side length of a square
- a boolean value which (if
True) says that the squares should
be filled with the same color as their outline, or (if False) says
that the squares should not be filled (outline only)
Each square to be drawn has a random color, a random X-Y position, and a
random side length. Each square will have a different random color, position,
and side length. Here's how you figure out these values:
Use the random_color() function above to compute a random color.
The lowest and highest location values are used to randomly choose the center
location of the square (using the random.randint function we talked about in
class). Choose a random X coordinate and a random Y coordinate, and that will
be the location of the center of the next square to be drawn.
The lowest and highest side length values are used to randomly choose the
length of the side of the next square to be drawn.
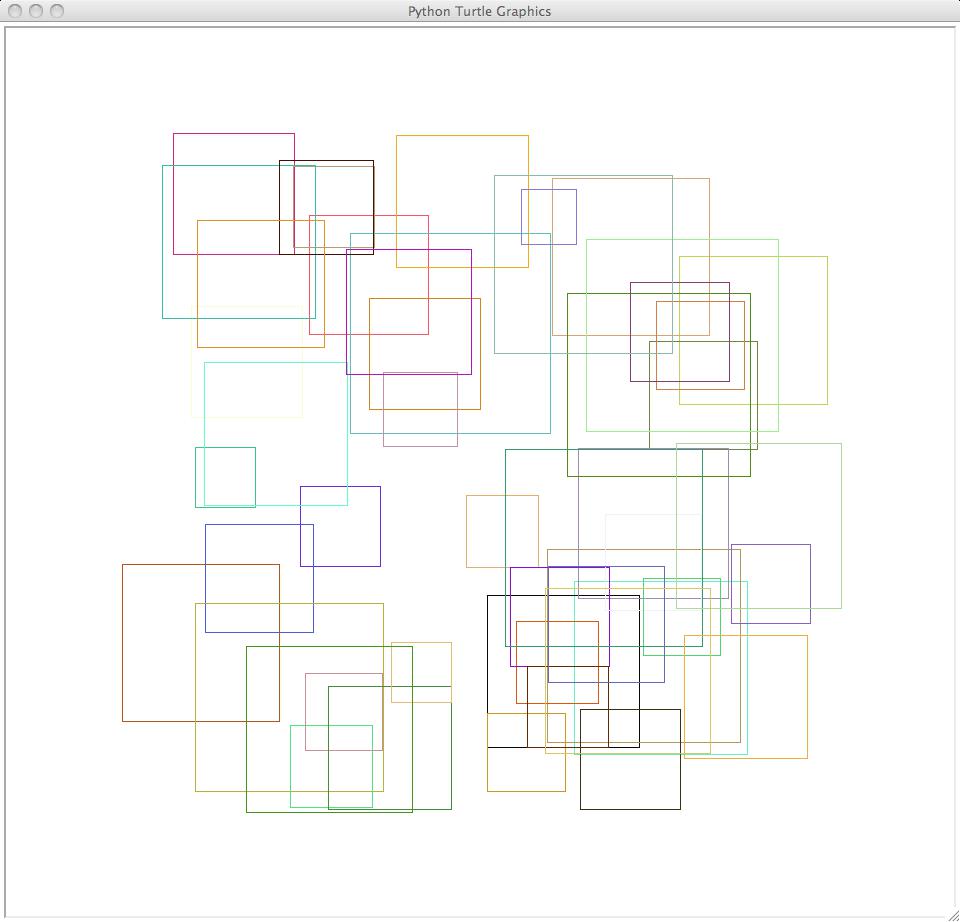
The function call draw_random_squares(50, -300, 300, 50, 200, False) might
generate an image like this:
The function call draw_random_squares(50, -300, 300, 50, 200, True) might
generate an image like this:
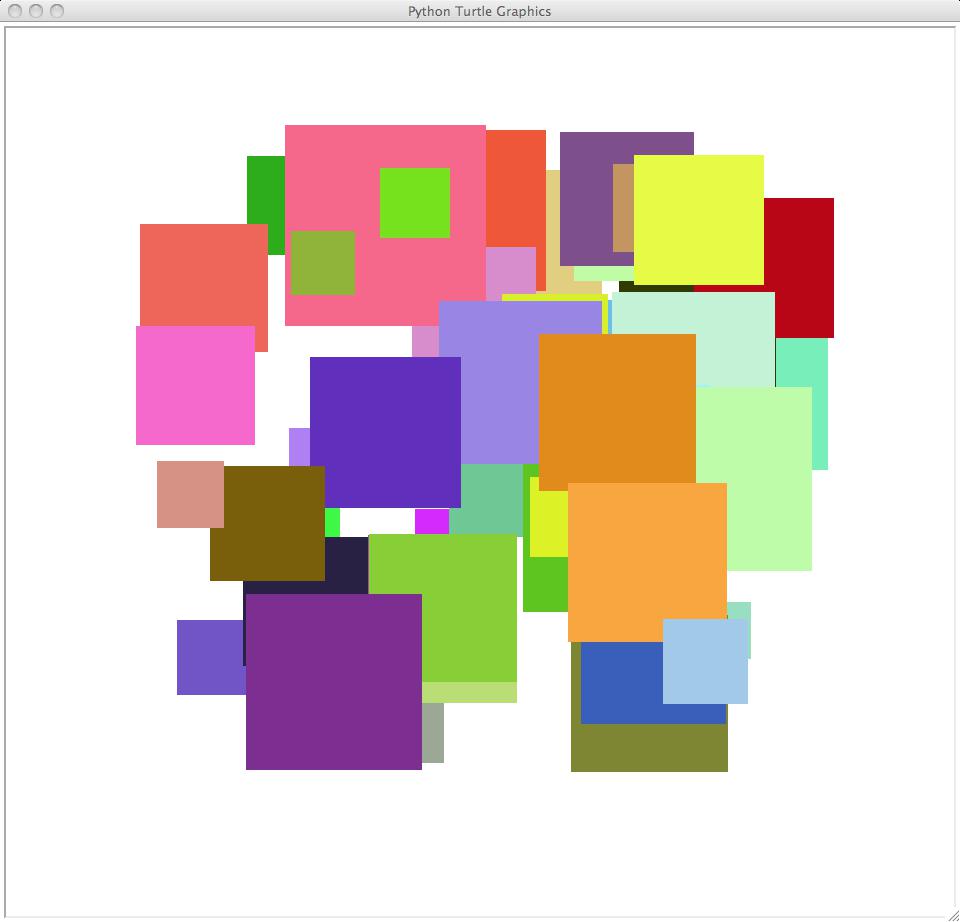
Note that the first image has unfilled squares while the second one has
filled squares. Each image has 50 squares. The centers of the squares are
located in the X-Y plane between location -300 and 300 in both the X and Y
directions. Each square has a side length no smaller than 50 pixels and no
larger than 200 pixels.
This problem should again use the draw_square function to draw the squares
themselves.
Testing your functions
We're supplying you with a test program called
turtle_tests.py which you should download and put into the same directory as
your lab3.py file. You can run the tests by typing this at the terminal
prompt:
python turtle_tests.py
If you've defined the functions properly, this program will show a series of
windows and images in the windows which look like the pictures above (the
randomly-generated ones won't look exactly like the pictures above, but they
will be similar). If you've forgotten to define a function, it will also notify
you of that. The test program won't try to determine if the output from your
program is correct or not; for that, look at the pictures above and see if your
functions' output looks similar.
Submission
Once you have completed this lab, submit lab3.py for Lab 3 on
csman. Do not submit the
turtle_tests.py file.
Copyright (c) 2012, California Institute of
Technology. All rights reserved.