Boggle-Board UI
This week you will begin working on the user interface for your Boggle
game. There are two classes to concentrate on this week; one is a
"Boggle button" that displays a single letter of the Boggle board, and
the other is the "Boggle board" class that manages the display of the
entire board.
To keep your life simple, you should build your UI classes off of
existing Swing classes, and just extend their capabilities as needed.
Your Boggle-button class should derive from javax.swing.JButton,
and your Boggle-board class, being a collection of Boggle buttons, should
derive from javax.swing.JPanel.
And, as always, make sure you use Javadoc-style comments for all of the
code you write,
Swing UI Refresher
If you don't remember the details of how to create event-handlers for Swing
UI components, the key details are as follows:
-
Handle ActionEvents from JButtons, not mouse-click
events. Swing buttons support keyboard interaction as well, and that
won't fire mouse-events. The right way to handle buttons is to register
for their action-events.
-
The best way to create event-listeners is frequently to do this with a
private inner class, so that your class' public interface doesn't get
cluttered up with random event-handler methods. The above lecture slides
go through this technique in some detail.
-
Remember that all Swing components are NOT thread-safe! You must only
interact with them from the Swing event-dispatcher thread. This is why
the Intro Java lectures talk about the javax.swing.SwingUtilities
class. So, read up on this as well. This week I give you some code that
uses SwingUtilities, but you will need to write your own code for
this in the very near future.
Boggle-Buttons
Your Boggle-button display class will display one cell of a Boggle
board. Although this is conceptually simple, we want to provide some
nice visual cues for the user, so that they know what letters are
available to choose from, and so that the board is easy to read. But
more on this in a moment.
You are encouraged to name your "Boggle button" class with the same
naming convention as all Swing components; starting with a "J". For
example, you might call your class "JBoggleButton."
Each Boggle-button needs to track three pieces of state:
-
The location of the button within the Boggle board. This
could be inferred, but it is much easier to implement the
Boggle-board features below if the buttons know where they appear
within the grid.
This can be just an (x, y) pair of values, zero-indexed, of course.
Allow the location to be specified in the constructor, and provide
accessors as well.
DO NOT expose these values as getX() and
getY()!!! Swing components already have accessors with
these names for positioning UI components within a Swing container,
and it will completely mess up the layout of your UI components.
(I spent hours on this bug, so don't make the same mistake!) Instead,
call the accessors something else; getBoardX() and
getBoardY(), for example.
-
The value of the Boggle button, as a String. You can use the
existing getText() and setText(String) methods of the
JButton, or you can provide your own value field and
accessor/mutator pair. Just make sure to document your design choice
in the Javadocs for your class.
-
The current state of the Boggle button. This should be one of
the following values:
- "Unavailable," meaning that the user cannot select this button.
- "Available," meaning that the button has not yet been selected,
but the user could select it next.
- "Selected," meaning that the button has been selected and is
part of the current word.
Represent these state options with a Java enum (called
"State" for example), declared as a public member of your button
class. Then you can base your code on these state values, and
users of your button class can refer to these state values as well.
Provide an accessor and a mutator for the button's state. The
mutator should also update the button's appearance appropriately,
based on the state value that was selected. (Details of this are
given below.)
Since we want the user-interface to be readable, we don't want to use the
"default" button font. So, in the constructor for your class, you should set
your button's font to be a large, easily read font. (I chose a 40-point
sans-serif font, for example, but you might like serifs.)
Boggle-Button Borders
Your Boggle buttons should indicate their current state (unavailable, available,
or selected) based on two visual cues: their "enabled" state, and their border
color. Changing the "enabled" state of a Swing component is easy, but
JButtons don't have a border by default, so you will get to add one
using the setBorder(Border) method.
Add three constants to your button class, UNAVAILABLE_BORDER, AVAILABLE_BORDER,
and SELECTED_BORDER. (These should be private constants, since they are only
used internally by your class, so declare them as private static
final.) Initialize each constant via a call to the appropriate method on
javax.swing.BorderFactory to create a line-border three pixels wide.
- The "unavailable" border should be gray.
- The "available" border should be green.
- The "selected" border should be red.
Once you have these border constants set up, you can make your "set state"
mutator update the button's appearance in the following way:
- When a button's state is "unavailable," it should be disabled and have a
gray border.
- When a button's state is "available," it should be enabled and have a
green border.
- When a button's state is "selected," it should be enabled and have a red
border.
As mentioned before, update your button's appearance within the "set state"
mutator. Also, call this mutator from your constructor; don't manually set
these values anywhere except from this mutator.
Displaying Boggle Boards
Once you have your Boggle button class ready, you can build out the "Boggle
board" class. This class will show an N×N grid of Boggle buttons,
allowing users to create words from the letters on the Boggle game-board.
Continuing the "Swing UI component" naming convention, you could call this class
"JBoggleBoard". The class' constructor should take a single argument N,
specifying the dimensions of the boards it will display.
The JBoggleBoard class will of course need a reference to an actual
BoggleBoard instance, and the buttons should reflect the contents of
the BoggleBoard object.
Displaying the board is not such a difficult problem, especially since you have
your Boggle-button class. You can provide a method like this:
public void setBoard(BoggleBoard b)
The method would just loop through all buttons, setting each button's state to
match the BoggleBoard's value for the cell. (You could throw an
IllegalArgumentException if the size of the BoggleBoard
doesn't match the size of the JBoggleBoard.)
Building Words
Although this class could just let users press any old button, we want to make
our display class more intelligent than that. As the user is forming a word, we
want to be able to show the user which letters are already part of the word
(since each grid-cell can be used only once), and which letters are available
for selection. So, manage selection this way:
Keep a list (e.g. an ArrayList) of "selected buttons". Initially
the list starts out empty, and buttons get added to this list as the user
builds a particular word.
-
Initially, when no letters have been selected, all buttons should be in
the "available" state, since the user can select any letter. Here is an
image of a board in this state:

-
As buttons are selected, they are added to the list of selections. Each
button that appears in the "selected" list should be in the "Selected"
state, which means it will display a red border.
The last button in the "selected" list is special: all buttons
within one step of the last selection should be set to "available," unless
they are already selected.
All other buttons should be set to "unavailable." This way, users can
only make valid steps, according to the rules of Boggle.
Here is an example of the same board, after one cell has been chosen:
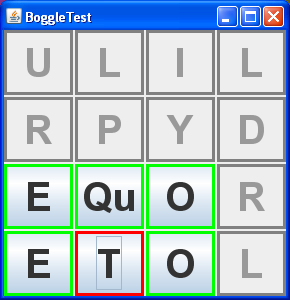
And, after the same board, after three cells have been chosen:
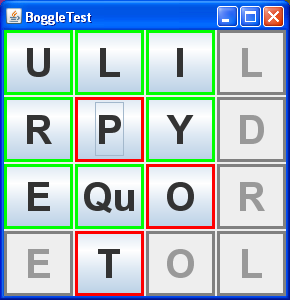
You can see how the selected letters are always indicated with red, and
the "available" letters which are valid next steps, are always indicated
with green. All other letters are disabled, so the user cannot select
them.
There are several ways to implement this display-update, but an easy way would
be to create a separate private method that handles the task of updating button
states. It needs to handle two cases:
-
If there are no selections, iterate through all cells and set them to
"available."
-
Otherwise, do these steps:
- Iterate through all cells and set them to "unavailable."
-
Iterate through the selection-list, and set each of these cells to
"selected."
-
Get the last button in the selection-list, and set all of its
immediate neighbors to "available," unless they are already in the
"selected" state. (Hint: Being able to retrieve the grid-location
of a button will be very useful for this step...)
There is one other situation that the board-display class must handle - if a
user clicks a button that has already been selected. In this case, you should
truncate the selection-list to end with that button, and then update the button
states appropriately. This feature will allow users to "back up" to a certain
point and resume creating their word from there.
Methods
Here is a list of the methods that should be provided by your JBoggleButton
class:
-
A "clear selections" method that clears out the selection-list and then
updates the display-state appropriately.
-
A "get word" method that iterates through the buttons in the selection-list
and returns their string-values concatenated together into a single word.
Go ahead and convert the result to all-lowercase before returning it. If
there are no letters selected, return an empty-string "", not null.
Testing Your Code
Because it is typically very hard to test user-interface classes, you should
just add a simple main() method to your JBoggleBoard class,
that throws up a very simple user interface that allows you to poke at the
board to make sure it works. It could look something like this:
    public static void main(String[] args) {
        javax.swing.SwingUtilities.invokeLater(new Runnable() {
            public void run() {
              JFrame f = new JFrame("BoggleTest");
              f.setDefaultCloseOperation(JFrame.EXIT_ON_CLOSE);

              JBoggleBoard boardGUI = new JBoggleBoard(BoggleBoard.DEFAULT_SIZE);
              f.add(boardGUI);

              f.pack();
              f.setVisible(true);
              f.setSize(300, 300);

              boardGUI.setBoard(new BoggleBoard());
            }
        });
    }
Once you have added code like this to your JBoggleBoard class, you can
run it at the command-line, like this:
java JBoggleBoard
If you have done your job properly, you should see your UI pop up, and you
should be able to select words on the Boggle board.
Another one in the bag...
Once you have finished all of your code for this week, leave your work in your
~/cs11/advjava/lab3 directory on the CS cluster.
Extra Credit!
If you want to try a few more challenging things, here are some ideas for you:
-
Update your JBoggleButton.State enum to have fields that store
the border and the enabled/disabled setting for each of the states. This
way your "set-state" mutator can use the State object itself to
update the button's configuration.
-
Have your Boggle buttons handle "component resized" events, to properly
scale the font based on the button's actual size.
-
It is easy to create confusing words in this UI design; for example, if you
select a series of letters that crosses back over itself. Create some
arrow icons, then overlay them on the panel (perhaps with custom paint code
that extends the "standard" panel painting code), to show the exact
order in which the letters were selected. When more than one letter is
selected, then for each pair of adjacent selections, there should be an
arrow from the earlier selection to the later selection.
-
Find a way to make the buttons look like actual Boggle dice, instead of
just Swing buttons. You might find a way to incorporate images into the
background of the buttons' appearances. You might even rotate the letters
themselves by 90°, 180°, or 270° randomly, to mimic the actual
Boggle board appearance.
Copyright (C) 2008, California Institute of Technology.
Last updated April 23, 2008.